Converting addresses to latitude and longitude with TabPy and Tableau Prep

Table of Contents
One of the main strengths of Tableau is it’s mapping and geographic data analysis capabilities. But if we want to map concrete addresses, we need the concrete latitude and longitude of each individual data point in order to map them. How can we convert concrete addresses to latitude and longitude?
The answer is: with Tabpy, Tableau Prep and an API that allows to convert addresses to latitude and longitude, like the Google Geocoding API.
The challenge of visualizing addresses#
It’s very easy to map data in Tableau when we have fields like Country, State or Province, City, Postal Code or even geospatial data in shapefiles (shp). But if we have concrete addresses in our data, we will need to convert them, somehow, to geographic coordinates (latitude and longitude) to be able to visualize them.
Geocode an address is something that looks easy today because of services that are part of our daily live, like Google Maps. If I want to know where a concrete address is, I go to Google Maps, search for the address and… done! There it is. With Google Maops we can even get the latitude and longitude of a concrete point in the map just by right clicking.
Unfortunately, Tableau and BI and visualization tools are not capable of automatically transform addresses to latitude and longitude. But we can use Tableau to speed up the process to transform them and use them. To do so, we are going to use the following tools:
- TabPy: A Tableau extension to executre Python scripts, amplifying Tableau’s capabilities.
- Tableau Prep: To run a flow that will allow us to load our address data, execute a Python script, check the results and store them wherever we want: local files, databases, Tableau Cloud, Tableau Server or Salesforce Data Cloud.
- Google’s Geocoding API: To search and transform the individual addresses, automatically, to latitude and longitude. A processes we usually call “geocoding”.
Let’s go through the process step by step.
Step 1: Install TabPy#
We can install TabPy in our local machine or in a Server to use it across our organization. To make this example easier, we will install it in our computer.
To do so, first we will need to install Python. I’ll assume you already have Python installed in your computer, but if you don’t, I’ll recommend following the official instructions in their website.
Update pip#
With Python installed, we will need to install and update pip by running this code in our Command Line:
python -m pip install --upgrade pip
Install TabPy#
Once pip is installed and updated, it’s time to install TabPy. Again through our Command Line:
pip install tabpy
Done! We have TabPy installed to use it later.
Step 2: Install pandas and googlemaps libraries#
We will need some additional Python libraries for our Python script, so we will make sure now that we have them installed. The first one is pandas, which you probably already have as it’s one of the most common Python libraries. To install it, run this code again in your Command Line:
pip install pandas
Next step is to install the googlemaps library, that will allow us to directly use Google Maps platform in Python. Again, in your Command Line, run:
pip install googlemaps
Perfect! We have everything we need Python related.
Step 3: Activate Google’s Geocoding API in Google Cloud#
Next thing we need is a service that transform our addresses to latitudes and longitudes. Today there are a lot of different services available to do this: Amazon Geocoding, Mapbox Geocoding, Openroute Service or Google Geocoding API.
The reason I’m using the last is simple. It’s the first one I tried, I found it easy to use and the output returned by the Google API is very accurate.
Configure Google Cloud#
What it’s important to know is that Google’s Geocoding API is a paid service part of the Google Cloud Platform. If I’m not wrong, for a small number of queries is very cheap, or even free as Google gives you a limited monthly allowance. But it’s a service to be used carefully to avoid high costs if you suddenly try to geocode hundreds of thousands of addresses for example, so I always recommend checking the official documentation here.
Accessing Google Cloud#
To start using Google Cloud, first we need to navigate to Google Cloud and access the Console with a Google account. As of today, the link to access the console is in the top right corner of the main Google Cloud website, as you can see by clicking in the following image.

Create a project#
Once we are in the console, we will need to create a project through the main menu:
Menu > IAM & Admin > Create project.

We need to give the project a name, add a billing account as Google Cloud is a paid service, and a location. In my case, as I use Google Cloud for personal use and I don’t have an enterprise Google Workspaces service, I left the location as No Organization but everything worked well. Finally, we click Create and we have our project ready.

Create credentials to use Google Maps API#
With our project created, now we need to go to the Credentials section:
Menu > APIs & Services > Credentials.

Then, in the next screen we need to click on:
Create credentials > API key
Once the API key is created, in the main Credentials page we should be able to see the default name of the API credentials, the creation date and restrictions. I’ll cover a bit more the options we can customize, so click on the API key to open it an see the full details.
Credentials configuration and limits#
Why is important to know the credential options available? Because it allows us to limit the usage of the key and avoid inappropiate use of our API.

Here we can update the API key name, check the * API key value* and define two types of restrictions:
- IP address restrictions: To specify IP addresses that are allowed to use our API key.
- API restrictions: To limit the type of APIs that our key can be used for. In our case, we could limit the API to only be used with the Geocoding API.
Once we have created the API credential and limit its usage, we can move forward.
Step 4: The Python script to use in Tableau Prep#
Now it comes the most difficult part, at least for me that I’m not a Python expert. What we need know is a Python script that reads our data with addressses in Tableau Prep, sends those addresses using TabPy to the Google API to geocode them and returns the results back to Tableau Prep. To do this, we will need a format for our addresses that something similar to this:
Street Name, 1, City, Province / State, Country
How to create a Python script for Tableau Prep and TabPy?#
If you are not interested in learning the details of how Tableau Prep / TabPy scripts are build, feel free to move forward directly to the script section](#script).
To those of you that are interested in understand a bit more how to create your own scripts for your own use cases, there’s a few things to have in mind to make sure your script works well in Tableau Prep:
When you create your script, include a function that specifies a pandas (pd.DataFrame) as an argument of the function. This will call your data from Tableau Prep Builder.
You will also need to return the results in a pandas (pd.DataFrame) using the following supported data types:
Data in Prep Data in Python String Standard UTF-8 String Decimal Double Int Integer Bool Boolean Date String in ISO_DATE format: “YYYY-MM-DD” DateTime String in ISO_DATE_TIME format: “YYYY-MM-DDT:HH:mm:ss” If you want to return different fields than what you input (like our case, because we send addresses and we want to get latitude and longitude fields that are not part of our dataset), you’ll need to include a get_output_schema function in your script that defines the output and data types. You also need to use the following syntax when specifying the data types for your fields in the get_output_schema:
Function in the script Resulting data type prep_string() String prep_decimal() Decimal prep_int() Integer prep_bool() Boolean prep_date() Date prep_datetime() DateTime
The geocoding script#
Here’s the geocoding script that we will use in Tableau Prep:
import googlemaps
import pandas as pd
import json

def geocode_address(df):

    lat = []
    lon = []
    adr = []
    for i in df.index:
        mykey = 'paste-here-Google-api-key'
        gmaps = googlemaps.Client(key=mykey)
        id = df['address'][i]
        print(id)
        geocode_result = gmaps.geocode(id)
        json_data = json.dumps(geocode_result)
        json_dict = json.loads(json_data)
        lt = json_dict[0]['geometry']['location']['lat']
        lg = json_dict[0]['geometry']['location']['lng']
        formatted_address = json_dict[0]['formatted_address']
        adr.append(formatted_address)
        lat.append(lt)
        lon.append(lg)

    df = pd.concat([df['address'], pd.Series(adr, name='formatted_address'),
                     pd.Series(lat, name='latitude'), pd.Series(lon, name='longitude')], axis=1)
    return df

def get_output_schema():
    return pd.DataFrame({
        'address': prep_string(),
        'formatted_address' : prep_string(),
        'latitude' : prep_decimal(),
        'longitude' : prep_decimal(),
        })
Now the important question, what we need to do with the script?
In my case, I saved the file with the name tabpy_geocoding.py. If you use Github you can also access the file through my Github repository.
Script to geocode addresses and convert them to latitude and longitude using Python’s googlemaps module, TabPy and Tableau Prep
Now that you have the file created, it’s also very important that you edit like 18:
| |
And replace the paste-here-Google-api-key text and paste there the API credential from Google created in the previous step. Remember that the key needs to be between quotes.
Step 5: Start TabPy#
Let’s recap: We installed TabPy, create an API key in Google Cloud, download the python script and update it with our credential key. Now is when we can start tabPy. If we have installed TabPy correctly in our computer we just need to execute this command in our command line:
tabpy
It might give us an alert saying that we are not using any username / password credentials but we can just ignore this for now and press y to continue. We should see then the port where TabPy is running, normally port 9004. TabPy is ready for use. Now we need to create the Prep flow.
Step 6: Configure TabPy in Tableau Prep: Analytics Extensions#
But first we need to configure TabPy in Tableau Prep. How? Through the Analytics Extension Connections. To do this, go to the following menu in Tableau Prep:
Menu > Server > Settings and Performance
> Manage Analytics Extension Connection.

Then we select TabPy in the dropdown menu, type localhost in Server if we following this example and we are running TabPy through our computer, 9004 in Port and we can leave blank the username and password. If you want to configure a username and password in the future, you can do so following the TabPy official documentation in Github.
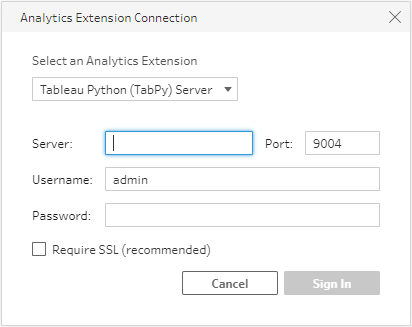
Click on Sign In, and TabPy should be ready to be used in our flow.
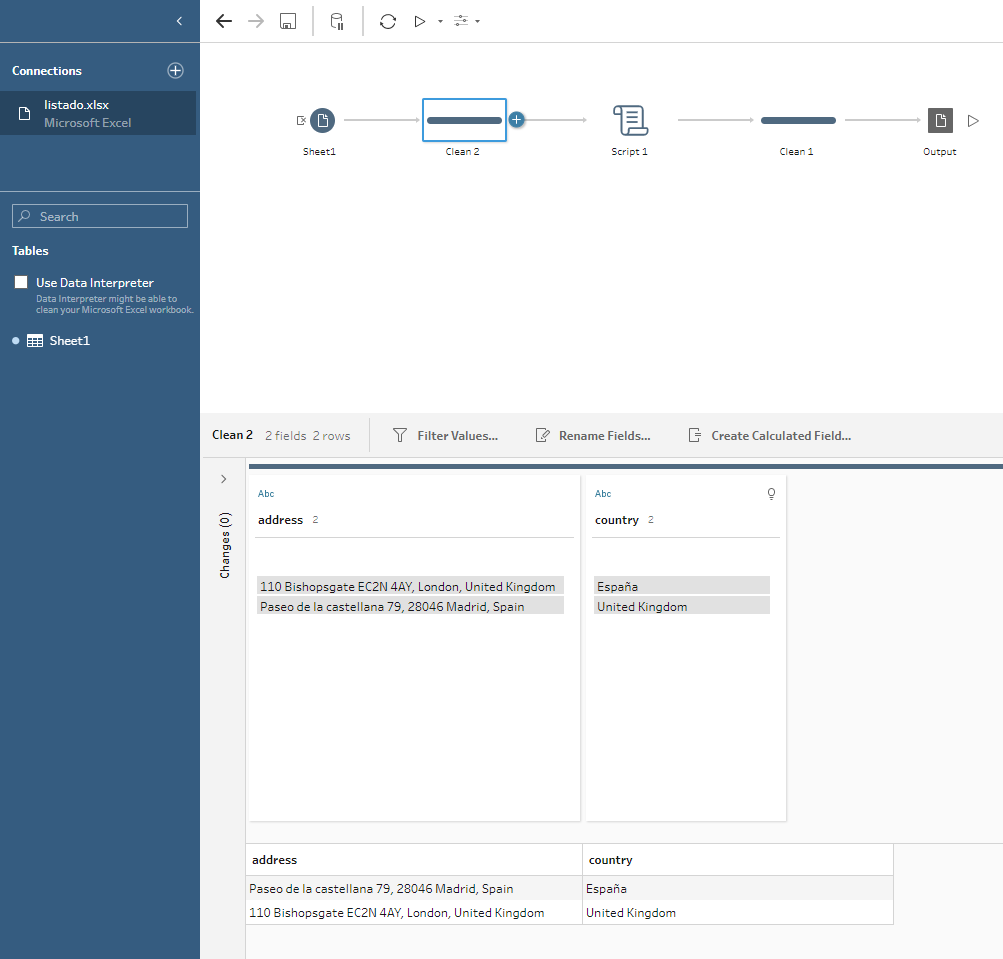
Step 7: Create the Tableau Prep Flow#
This might be one of the easiest steps of all the process: first we need to input our data with the addresses. The most important thing is that the address field we use it’s called “address” if we don’t want to change the script at all, but you can also rename the field in a clean process inside your flow.
The second important step in our flow is the Script, where we will select TabPy as the Connection Type, select our .py file created in step 4 in the File Name section and lastly, type geocode_address in the Function Name, which is the name of the function to be used in our script to geocode the addresses.
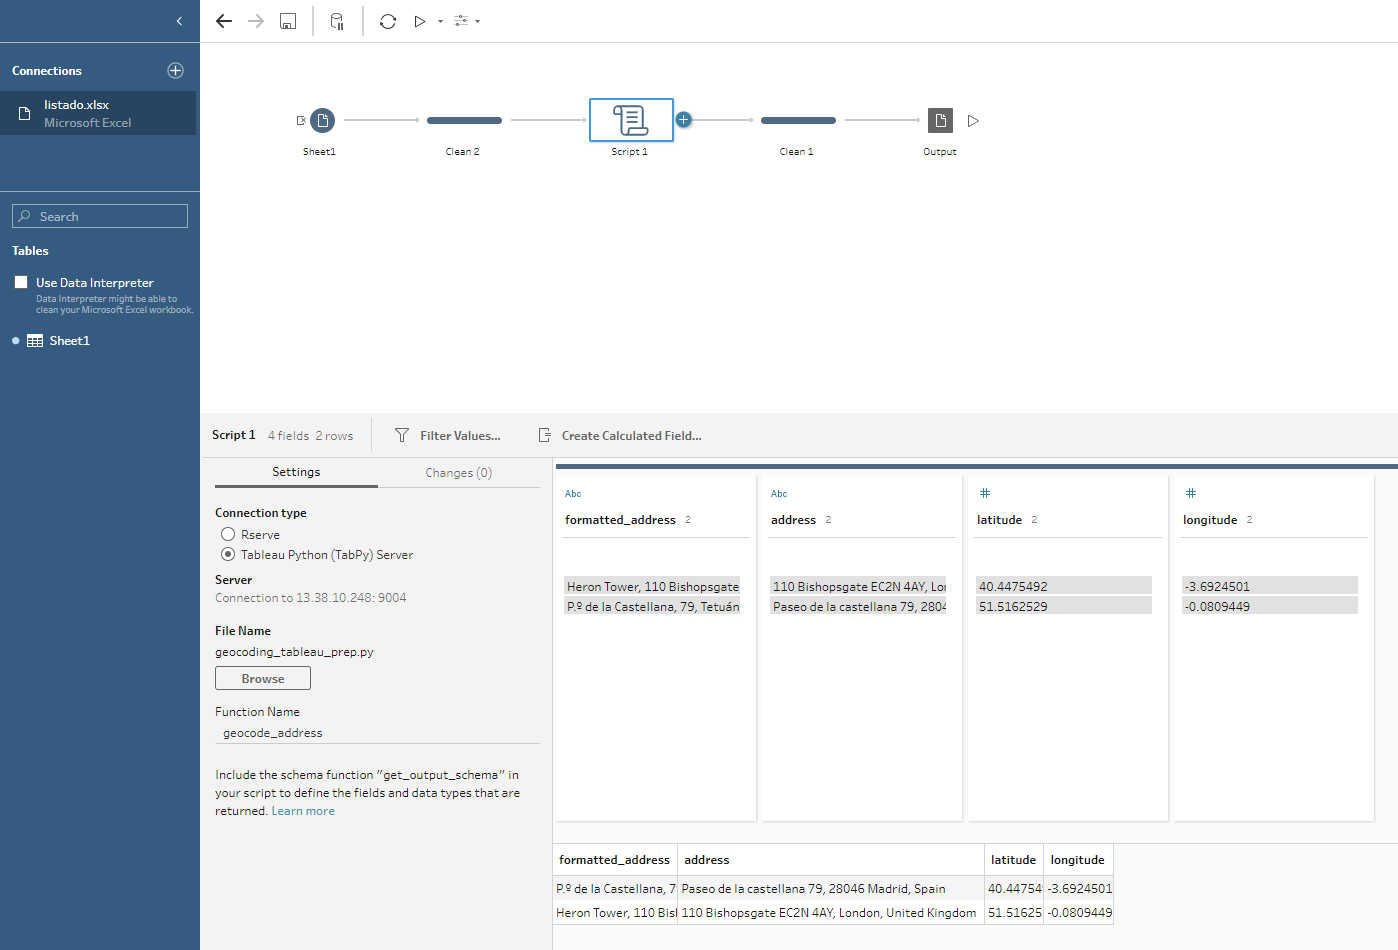
As you can see in the image above, the script read the field “address” from my data and returned that same column plus three additional columns:
- formatted_address: A column with the address that Google returns.
- latitude: The latitude of the address returned.
- longitude: The longitud of the address returned.
Done! We have our addresses geocoded. Last step would be so save the output results wherever we want: a local file, a database, Tableau Cloud, Tableau Server or Salesforce Data Cloud, in order to visualize afterwards those locations easily with Tableau using the latitude and longitude.